Learn About Bulk Mailing and Tracking → Mail Merge for Barcoding
 Scott
Scott
Postage $aver Software
To create USPS Intelligent Mail barcodes, you first use special software to create a code of 65 letters, which represent the zip code of the address plus other information about the address and about your mailing. Our Postage $aver Pro software and our Postal Barcoder Max software each can create this code and save it in your mailing list file.
 But, you don't actually print the letters on your mail ... you have to convert the letters into the bars that the postal sorting equipment can read.
The easiest way to do that is to do a simple mail merge using Microsoft Word (or any similar word processing program), along with a special font that changes the letters into the corresponding bars. We provide this font free when you purchase either Postage $aver Pro or Postal Barcoder Max.
In this video, we walk you through setting up your mail merge in Microsoft Word so that it will automatically print the barcodes with your addresses.
Questions? Ask us and we'll get you fast answers.
Ready to start saving postage right now?
Try Postage $aver FREE for 30 days!
Click for complete info and free trial!
How to use a mail merge in Microsoft Word to add Intelligent Mail Barcodes to your addresses
ScottPostage $aver Software
To create USPS Intelligent Mail barcodes, you first use special software to create a code of 65 letters, which represent the zip code of the address plus other information about the address and about your mailing. Our Postage $aver Pro software and our Postal Barcoder Max software each can create this code and save it in your mailing list file.
But, you don't actually print the letters on your mail ... you have to convert the letters into the bars that the postal sorting equipment can read.The easiest way to do that is to do a simple mail merge using Microsoft Word (or any similar word processing program), along with a special font that changes the letters into the corresponding bars. We provide this font free when you purchase either Postage $aver Pro or Postal Barcoder Max.
In this video, we walk you through setting up your mail merge in Microsoft Word so that it will automatically print the barcodes with your addresses.
Questions? Ask us and we'll get you fast answers.
Ready to start saving postage right now?
Try Postage $aver FREE for 30 days!
Click for complete info and free trial!

Here's what the video says, if you'd rather read it:
In this video, I'm going to walk you through printing addresses with Intelligent Mail Barcodes using a mail merge in Microsoft Word. It's really pretty easy, but Microsoft's instructions can be confusing, so I'll try to get you straight through it without getting you lost.
Intelligent Mail Barcodes are the barcodes that USPS requires for barcoded bulk mailing discounts and for tracking your mail.
 These barcodes are created using special software that combines the zip code with other information about your mail to create a code consisting of 65 of the letters A, D, T or F.
But you don't print those letters on your mail - you use a special Intelligent Mail barcode font to turn those letters into the bars that you're use to seeing, and then the postal equipment reads the bars. If you don't have an Intelligent Mail barcode font like that, our SmartBars 12 font is an inexpensive font that will do the job.
OK, so you've already run software to create your letter codes, in, say, an Excel file, and they look something like this:

Now, how do you turn those into actual barcodes and get them onto your envelopes or labels or directly onto your mail pieces?
The easiest way is to create what's called a "mail merge" in Microsoft Word.
So, let's open Word and open a new blank document. By the way, I'm using Word 2007 for Windows. Other versions of Word might look a little different, but the process is similar, and you should be able to follow along.
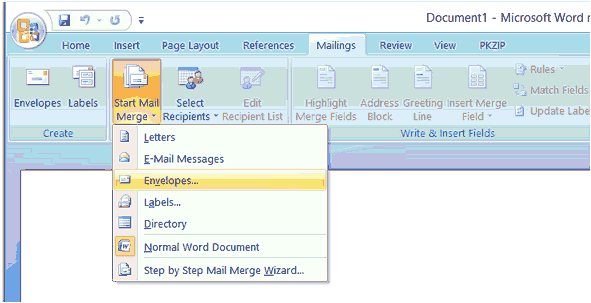
So first, click the Mailings tab. Then click Start Mail Merge.
Select the type of document you are creating. I'm going to pick envelopes, but it works pretty much the same for labels or letters:
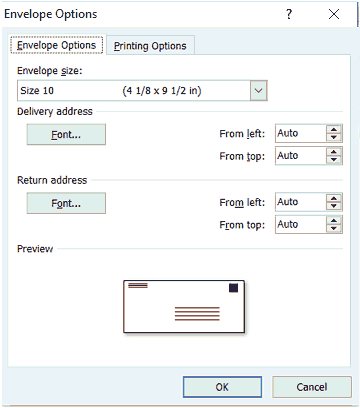
You get a selection of envelope sizes. I'm going to select standard size 10 business envelopes. And you can also set up things like how the envelopes will print:
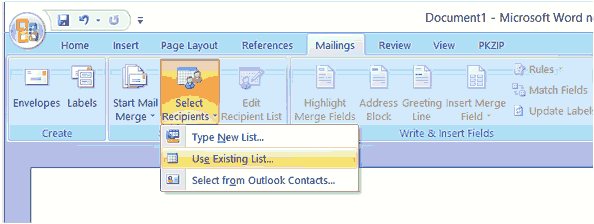
Now, before you put the printing on your envelope, you need to connect it to your Excel file because you want the information from your Excel file. So click on Select Recipients. And click on Use Existing List, because you want to use the list you already added barcodes to:
Now find your Excel file, where you have it saved. And, since Excel files can have more than one spreadsheet (or table), you need to select your Excel spreadsheet.
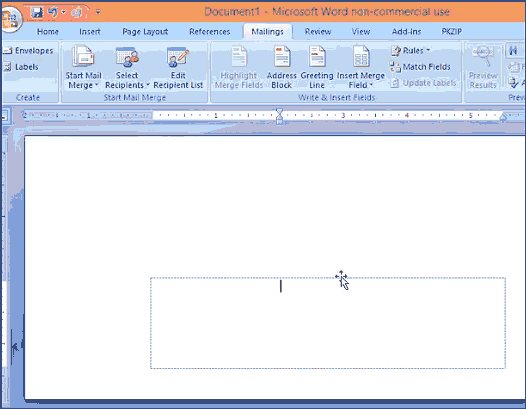
Now it's time to do the print layout on the envelope. First, click in the lower part of the center of the envelope, where the address should go. You'll see that Word provides an addressing area for you. The cursor is sitting right at the top line of the addressing area:
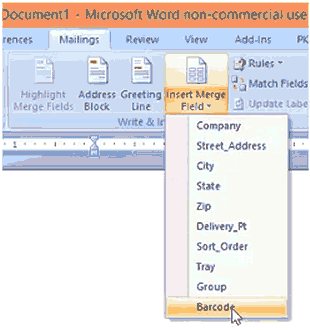
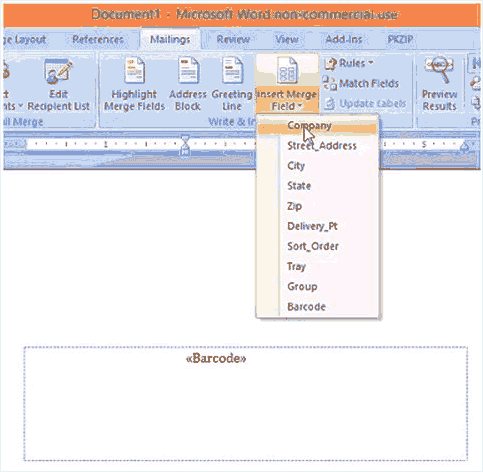
Now go up to Insert Merge Field, and click it, and you'll see a list of all of the columns in your Excel file.
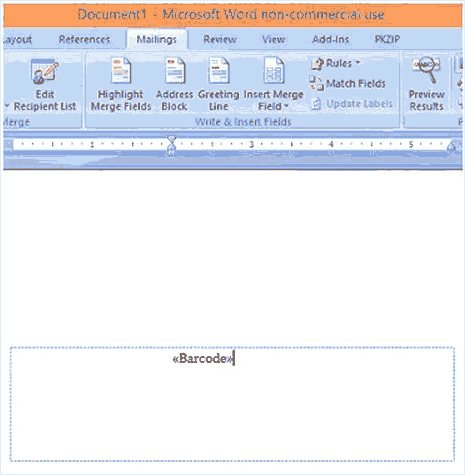
Let's work with the barcode field first. There are a few different places where USPS allows you to put the barcode, but the easiest is just to put it at the top of the address. And since that's where the cursor is, just choose the barcode column from the list, and it will set it up automatically to put your barcode there:
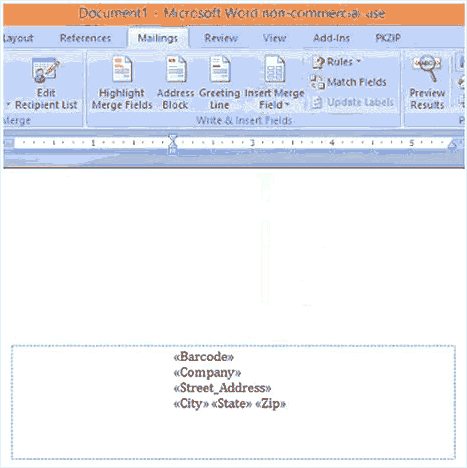
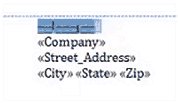
Then go ahead and hit return to move to the next line, and continue to build the address using the columns in your Excel list.
So first you'll have your company. And then your street address. Then city, and a space, and state, and a space, and zip code:
So there's the whole address:
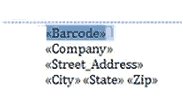
Now, here's the most important step.....
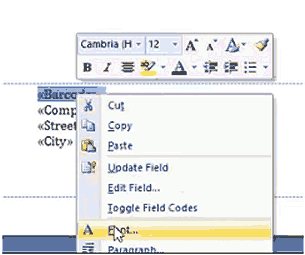
Swipe across the entire barcode field name to select it. Make sure you include the little brackets on each end. Otherwise it may not work:
Now, right-click what you've selected, and select Font:
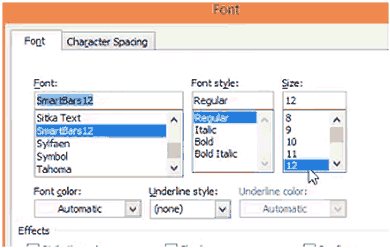
And then choose the SmartBars 12 printer font, right there, regular font style, 12 point. You must use 12 point size for this particular font for the barcode to come out at the right size:
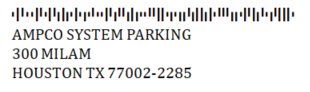
Now note that the word "Barcode" disappears and you only see a few bars, because you are now seeing "Barcode" written in the barcode font, so you don't see the letters any more, you just see bars:
You can also change other lines in the address if you want to show them differently. For instance, we could select the company name and right click and make it bold, if you want all the companies to come out in bold letters. And you can change anything else you want. But just don't change anything other than the barcode line into SmartBars 12.
At this point, you can also add other things to the envelope if you want. For example, if there's not already a return address on the envelopes you've been using, you are using, you can come up here and you can add a return address to your envelope, and it will print on every envelope. There's no particular different information from envelope to envelope.
You can also put your permit information if it's not already on your envelopes and you want to use it. You can come over here and set up a column just like you do in Microsoft Word. Type the required information, format it, and put it in a box. It will print on every envelope.
Once you've finished laying out the envelope, save it so you don't have to do this again. You want to save it as a Word Template. Each time you open it, it will automatically connect to your Excel file, but you can always change it if you want to use a different file.
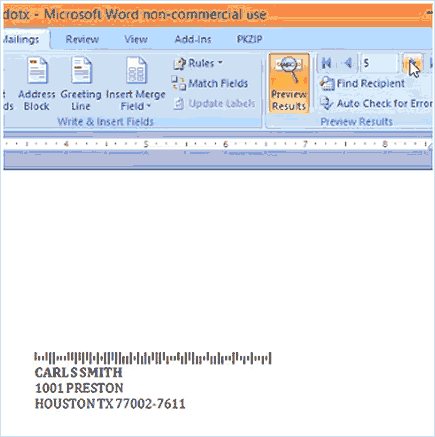
Now you can come up and click Preview Results to look at your merged envelopes. There you go. The information from the Excel file automatically moves into each envelope:
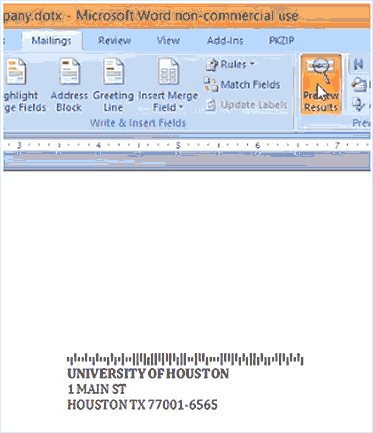
You go right on down the list. All of the information and the accompanying barcode:
If you're happy with it, go ahead and click Finish and Merge, and you're good to go!
Remember to check out our Postal Barcode Max barcoding software, and our Postage Saver Pro bulk mail preparation software, plus our SmartBars 12 font. While you're here, you'll also find lots of helpful information about bulk mailing and tracking your mail.
Let us know if you have any questions, and thanks for stopping by.
Ready to start saving postage right now?
Try Postage $aver FREE for 30 days!
Click for complete info and free trial!
Intelligent Mail Barcodes are the barcodes that USPS requires for barcoded bulk mailing discounts and for tracking your mail.
AFDADAADTDDADTFFDADDDDDDAFTFTAAAFAAAFATFTDFTAAFDATFDDTTDDTDFADTAA
But you don't print those letters on your mail - you use a special Intelligent Mail barcode font to turn those letters into the bars that you're use to seeing, and then the postal equipment reads the bars. If you don't have an Intelligent Mail barcode font like that, our SmartBars 12 font is an inexpensive font that will do the job.
This video starts with you already having the 65-letter codes in a file, and I'm going to explain how to get from there to printing the actual barcodes. If you haven't yet created the letter codes, you can do that with Postage Saver Pro software or Postal Barcoder Max software. They both include the SmartBars 12 font at no extra charge, and you can try them both for free at savepostage.com.
OK, so you've already run software to create your letter codes, in, say, an Excel file, and they look something like this:
Now, how do you turn those into actual barcodes and get them onto your envelopes or labels or directly onto your mail pieces?
The easiest way is to create what's called a "mail merge" in Microsoft Word.
So, let's open Word and open a new blank document. By the way, I'm using Word 2007 for Windows. Other versions of Word might look a little different, but the process is similar, and you should be able to follow along.
So first, click the Mailings tab. Then click Start Mail Merge.
Select the type of document you are creating. I'm going to pick envelopes, but it works pretty much the same for labels or letters:
You get a selection of envelope sizes. I'm going to select standard size 10 business envelopes. And you can also set up things like how the envelopes will print:
Now, before you put the printing on your envelope, you need to connect it to your Excel file because you want the information from your Excel file. So click on Select Recipients. And click on Use Existing List, because you want to use the list you already added barcodes to:
Now find your Excel file, where you have it saved. And, since Excel files can have more than one spreadsheet (or table), you need to select your Excel spreadsheet.
Now it's time to do the print layout on the envelope. First, click in the lower part of the center of the envelope, where the address should go. You'll see that Word provides an addressing area for you. The cursor is sitting right at the top line of the addressing area:
Now go up to Insert Merge Field, and click it, and you'll see a list of all of the columns in your Excel file.
Let's work with the barcode field first. There are a few different places where USPS allows you to put the barcode, but the easiest is just to put it at the top of the address. And since that's where the cursor is, just choose the barcode column from the list, and it will set it up automatically to put your barcode there:
Then go ahead and hit return to move to the next line, and continue to build the address using the columns in your Excel list.
So first you'll have your company. And then your street address. Then city, and a space, and state, and a space, and zip code:
So there's the whole address:
Now, here's the most important step.....
Swipe across the entire barcode field name to select it. Make sure you include the little brackets on each end. Otherwise it may not work:
Now, right-click what you've selected, and select Font:
And then choose the SmartBars 12 printer font, right there, regular font style, 12 point. You must use 12 point size for this particular font for the barcode to come out at the right size:
Now note that the word "Barcode" disappears and you only see a few bars, because you are now seeing "Barcode" written in the barcode font, so you don't see the letters any more, you just see bars:
You can also change other lines in the address if you want to show them differently. For instance, we could select the company name and right click and make it bold, if you want all the companies to come out in bold letters. And you can change anything else you want. But just don't change anything other than the barcode line into SmartBars 12.
At this point, you can also add other things to the envelope if you want. For example, if there's not already a return address on the envelopes you've been using, you are using, you can come up here and you can add a return address to your envelope, and it will print on every envelope. There's no particular different information from envelope to envelope.
You can also put your permit information if it's not already on your envelopes and you want to use it. You can come over here and set up a column just like you do in Microsoft Word. Type the required information, format it, and put it in a box. It will print on every envelope.
Once you've finished laying out the envelope, save it so you don't have to do this again. You want to save it as a Word Template. Each time you open it, it will automatically connect to your Excel file, but you can always change it if you want to use a different file.
Now you can come up and click Preview Results to look at your merged envelopes. There you go. The information from the Excel file automatically moves into each envelope:
You go right on down the list. All of the information and the accompanying barcode:
If you're happy with it, go ahead and click Finish and Merge, and you're good to go!
Remember to check out our Postal Barcode Max barcoding software, and our Postage Saver Pro bulk mail preparation software, plus our SmartBars 12 font. While you're here, you'll also find lots of helpful information about bulk mailing and tracking your mail.
Let us know if you have any questions, and thanks for stopping by.
Ready to start saving postage right now?
Try Postage $aver FREE for 30 days!
Click for complete info and free trial!